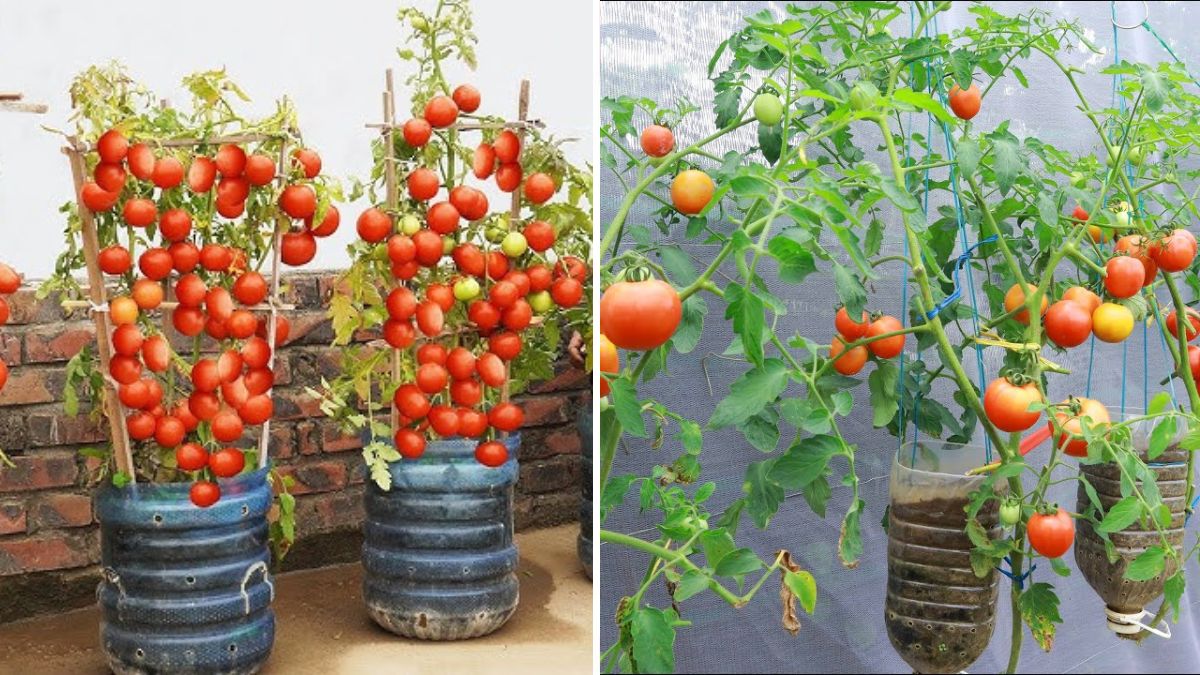
Tomatoes are one of the most popular vegetables grown around the world. Their rich flavor, bright colour, and versatility in cooking make them a favourite in every kitchen. But what if you could grow fresh, juicy tomatoes right at home without using any pots, grow bags, or large garden space? Yes! You can easily grow tomatoes in plastic waste bottles, using a completely zero-cost, space-saving method.
Whether you live in a flat, small house, balcony apartment, or hostel — this method works beautifully. In this complete guide, you’ll learn step-by-step how to grow tomato plants in plastic bottles and enjoy a full harvest from simple seeds.
🍅 Why Grow Tomatoes in Plastic Bottles?

Using waste plastic bottles is not only economical but also eco-friendly. Here’s why this method is perfect:
- ♻️ Reuses waste bottles and reduces plastic pollution
- 💸 Zero extra cost
- 🏡 Great for tiny spaces and balconies
- 🌱 Helps regulate soil moisture
- 🧑🌾 Extremely easy for beginners
- 🌼 Ensures quick growth and early harvest
Tomatoes grow very well even in narrow, vertical spaces, so bottles provide the perfect mini-container.
🧴 Step 1: Choosing the Right Bottle & Preparation

You can use any plastic bottle you have at home:
- 1 litre
- 2 litres
- 5 litres (best for larger harvest)
How to Prepare the Bottle:
- Wash the bottle thoroughly.
- Make an opening or “window” on the side (big enough to fill soil).
- Create 8–10 drainage holes at the bottom.
- Keep the cap slightly loose so excess water can drip out.
- Place the bottle in a tray or container to catch draining water.
A well-prepared bottle ensures healthy root growth and prevents fungus.
🌱 Step 2: Soil Mix for Fast Growth

A good soil mix is the foundation of a healthy tomato plant.
Ideal Soil Mix for Tomatoes:
- 40% Garden soil
- 40% Compost (cow dung, vermicompost, kitchen compost)
- 20% Cocopeat or river sand
Why This Mix Works:
- Compost boosts fruiting
- Cocopeat improves drainage
- Soil provides support
- Keeps roots aerated
Fill the bottle with the soil mix and lightly press it to remove air gaps.
🍅 Step 3: Sowing Tomato Seeds

You can use:
- Store-bought tomato seeds
- Seeds from a ripe tomato slice
How to Sow:
- Make small holes (1 cm deep).
- Drop 2–3 seeds in each hole.
- Cover with soil.
- Spray water gently.
Germination Time:
Tomato seeds germinate in 6–8 days.
Place the bottle in indirect sunlight for the first few days.
🌞 Step 4: Seedling Care (Day 7–20)

Once your seeds sprout, they need proper care to become strong plants.
Provide Light:
- Keep the bottle in full sunlight for 4–6 hours daily
- Rotate the bottle so the plant grows straight
Watering:
- Water only when the top layer feels dry
- Avoid overwatering; tomatoes dislike soggy soil
Thinning:
After seedlings grow 3–4 inches tall, keep only the strongest one in the bottle.
Cut the weaker seedlings — do NOT pull.
This helps the strongest seedling grow into a productive plant.
🌿 Step 5: Transplanting or Deep Planting
Tomatoes grow roots from their stem — this is a HUGE advantage.
How to Strengthen the Plant:
- When your seedling is 6–8 inches tall, remove the lower leaves.
- Add more soil into the bottle so the stem is buried deeper.
This creates a stronger root system, leading to more fruits.
🍀 Step 6: Regular Feeding & Care (Day 20–45)
Tomatoes are heavy feeders, meaning they need nutrients regularly.
Feed Every 10–12 Days:
- Add 1–2 handfuls of compost
- Use banana peel fertilizer
- Apply eggshell powder (optional)
Water Carefully:
- Keep soil moist
- Water slowly to avoid washing away nutrients
Provide Support (Very Important):
Tomato plants need support for upward growth.
You can use:
- Stick
- Bamboo piece
- Old pen or plastic rod
Tie the plant loosely with thread or soft cloth.
🌼 Stage: Flowering Begins (Day 35–45)
This is the most exciting stage! Your tomato plant will start producing small yellow flowers.
Tips for Blooms:
- Give 5–6 hours sunlight
- Avoid overwatering
- Feed potassium-rich fertilizer (banana peel water)
- Shake the plant lightly once daily for pollination
This helps increase fruit formation.
🍅 Step 7: Fruit Development (Day 45–70)
After successful pollination, tiny green tomatoes will appear.
Care During Fruiting:
- Ensure enough sunlight
- Water only at the base, never on leaves
- Add compost once every 2 weeks
- Remove yellow or dried leaves
Important:
If the bottle is very small, limit the number of tomatoes to 6–8 for healthy size.
🌡️ Handling Common Problems
Growing tomatoes in bottles is easy, but a few issues may arise.
1️⃣ Leaves Turning Yellow
Cause: Overwatering
Fix: Reduce watering + Improve drainage holes
2️⃣ Flowers Falling Off
Cause: Low sunlight or weak plant
Fix: Add compost + Keep in bright sunlight
3️⃣ Small Tomatoes
Cause: Lack of nutrients
Fix: Add banana peel fertilizer
4️⃣ Pest Attack (Whiteflies/Aphids)
Fix: Spray neem oil + soap water mixture once weekly
🍅 When to Harvest Your Tomatoes
Tomatoes turn from dark green → light green → yellowish → red.
Harvesting Tips:
- Pick when tomatoes are reddish-orange
- Don’t wait for full red on the plant
- Early picking increases total yield
Harvest Timeline:
| Stage | Days |
|---|---|
| Seed to seedling | 7 days |
| Seedling to flowering | 35–45 days |
| Flowering to fruit | 20–25 days |
| Final harvest | 65–75 days |
You can harvest for up to 30–40 days continuously after the first fruit.
🍽️ What You Can Make With Homegrown Tomatoes
Fresh homegrown tomatoes taste 10x better. Use them in:
- Tomato soup
- Salads
- Chutneys
- Pasta and pizza
- Curry base
- Sandwiches
- Sauce and salsa
Once you grow your own tomatoes, it becomes addictive!
🌱 Why This Method Is Perfect for Beginners
Growing tomatoes in bottles is:
- Simple
- Clean
- Low-maintenance
- Perfect for kids & school projects
- Great for small homes
- Fully sustainable
You can grow multiple bottles for continuous tomato supply.
🌿 Conclusion: Turn Your Waste Bottle Into a Mini Tomato Farm
With just a plastic bottle, a handful of soil, and a few seeds, you can grow fresh tomatoes at home—no garden required. This easy, budget-friendly method fits into any lifestyle and gives rewarding results within weeks.
Start today with one bottle, and soon you’ll have your own balcony tomato garden bursting with flavor and color.